
03 Feb Sublime Text 2 Tips & Tricks (updated)
After moving over to sublime 2 to this week. I found that it was very different to what notepad++ which I had been using for the past few years , after looking for a good tutorial on how to use it I came across this from NETTUTS
Sublime Text 2 is one of the fastest and most incredible code editors to be released in a long time! With a community and plugin ecosystem as passionate as this one, it just might be impossible for any other editor to catch up. I’ll show you my favorite tips and tricks today.
Sublime Text 2 is currently available for all major platforms: OS X, Linux and Windows.
1 – Bleeding Edge Versions
Sublime is in active development. If, like me, you want to use the latest possible version of the app, you can download the dev build. You’ll find that new (auto) updates are available every other day or so.
Download a dev build of Sublime 2 here.
2 – Get a Better Icon
Update: here is a better icon.
In its defense, Sublime Text 2 is still in a beta state. The official icon will likely/hopefully change with the official release. Until then, Nate Beaty created an alternative icon, if you prefer it.

To integrate it, you need to replace the existing “Sublime Text 2.icns” file with this new one. On a Mac, browse to Sublime 2 in your Applications/ folder, then right-click and “View Package Contents.” Lastly, browse to Contents/Resources/, and drag the new icon in, overwriting the existing one.
Please take note of the fact that, if you’re using the frequently updated development version of Sublime Text, with each update, the icon will be removed. With that in mind, don’t worry about the icon for the time being.
3 – Access the Command Palette
Similar to TextMate, we can use Sublime’s command palette by accessing the Tools menu, or by pressing Shift + Command + P, on the Mac. Whether you need to visit a Preferences page, or paste in a snippet, all of that can be accomplished here.

4 – Lightning-Fast File Switching

Press Control or Command + P, type in the name of the file you wish to access (fuzzy finder), and, without even pressing Enter, you’ll instantly be transported to that file. While Vim and apps like PeepOpen offer a similar functionality, they’re not nearly as fast as Sublime’s implementation.
5 – How Did We Survive Before Multi-Selection?
Editors like TextMate have long offered vertical selection, which is quite neat. But, with multi-selection, you can have multiple cursors on the page. This can drastically reduce the need for using regular expressions, and advanced search and replace queries. Perhaps a quick visual demonstration is in order…
To enable multi-selection, you have several options:
- Press
AltorCommandand then click in each region where you require a cursor. - Select a block of lines, and then press
Shift + Command + L. - Place the cursor over a particular word, and press
Control/Command + Drepeatedly to select additional occurrences of that word. - Alternatively, add an additional cursor at all occurrences of a word by typing
Alt+F3on Windows, orCtrl+Command+Gon the Mac. Amazing!!
6 – Indent Guides
Update: this feature now comes preinstalled with Sublime Text 2.
It’s such a small feature, but I’ve always loved how Notepad++ on Windows displays indent guides; it makes the page much easier to navigate and format. Sublime Text 2 offers this ability, via a plugin created by Nikolaus Wittenstein.

To integrate this plugin:
- Download it
- Rename the folder to “Indent Guides” and drag it into the
Packagesfolder. On a Mac, this path would beApplication Support/Sublime Text 2/Packages
7 – Package Control
The steps outlined in the previous tip (#6) are a bit tedious, aren’t they? Instead, we can install the excellent Sublime Package Control, which streamlines the entire process.
To install “Package Control,” open Sublime and press Control + `. Next, paste the following snippet into the console.
|
1
|
import urllib2,os;pf='Package Control.sublime-package';ipp=sublime.installed_packages_path();os.makedirs(ipp) if not os.path.exists(ipp) else None;open(os.path.join(ipp,pf),'wb').write(urllib2.urlopen('http://sublime.wbond.net/'+pf.replace(' ','%20')).read()) |
Don’t worry if you don’t understand the code above; just copy and paste!

Lastly, restart Sublime Text, and browse to Preferences -> Package Settings. If the installation was successful, you’ll now see a Package Control item in that list.
With Package Control installed, the process of adding new plugins and functionality becomes incredibly simple!
For a usage example, refer to the next item in this list.
8 – Alignment
If you’re the type who prefers to line up your equal signs – for example, in your JavaScript…
|
1
2
3
4
5
6
7
8
9
|
// Beforevar joe = 'joe';var johnny = 'johnny';var quaid = 'quaid';// Aftervar joe = 'joe';var johnny = 'johnny';var quaid = 'quaid'; |
…this process can be automated, via the Sublime Alignment plugin. Rather than downloading and installing it manually, let’s instead use Package Control (outlined in #7).
- Press
Shift + Command + P - Type “install,” to bring up the “Package Control: Install Package” option, and press Enter
- Look for “Alignment,” and press Enter to install it.
- You’re done; so easy! Type
Shift + Command + Ato auto-align.

This process can be repeated for all of the typical plugins we install, such as Zen Coding.
9 – Vim Fanatic
I’m a huge fan of Vim. The amount of power it provides is insane. The fact that I’ve switched over to Sublime Text 2 should speak volumes then!
If you’re using a dev build of Sublime Text (see #2 in this list), you can enable Vintage mode, which provides support for the Vi commands that we know and love — okay…some of us love. The rest of you hate it! 🙂
To enable Vintage mode, browse to Preferences/Global Settings - Default. Once this file opens, browse to the very bottom, and change "ignored_packages": ["Vintage"] to "ignored_packages": []. Next, restart Sublime, press the Escape key, and, tada: command mode!
Block Cursor
One thing you may notice is that, in command mode, it can be difficult to find the cursor (especially when taking advantage of things like bookmarks). On more than one occasion, I’ve found myself trying to hunt down its location.
While it’s not a perfect solution, a plugin, called “SublimeBlockCursor,” attempts to remedy this issue.

Note: While the readme states that SublimeBlockCursor can be installed, via Package Control, I wasn’t able to find it. Instead, I had to clone the project manually into the
Packagesfolder.
10 – Distraction Free Editing
Sometimes, we need to filter out all of the additional fluff that gets in the way of our coding. Use “Distraction Free Mode” to take this idea as far as possible. This option is available, via the View menu. Select “Enter Distraction Free Mode,” or use the Mac keyboard shortcut, Control + Shift + Command + F.

11 – You Can Still Use TextMate Bundles

TextMate snippets and themes port over nicely to Sublime Text. You only need to drop them in the Packages folder — .tmbundle extension intact, and Sublime will recognize the files. This means that the entire catalog of TextMate themes will work in Sublime!
For example, I’ve been working with the (fantastic) Slim templating engine a good bit lately, and needed better syntax highlighting. Fred Wu created a bundle for TextMate, but, tada, it works perfectly in Sublime Text as well! If you’re interested, you can download the Slim bundle here; it includes both snippets and syntax highlighting.
12 – Custom Themes
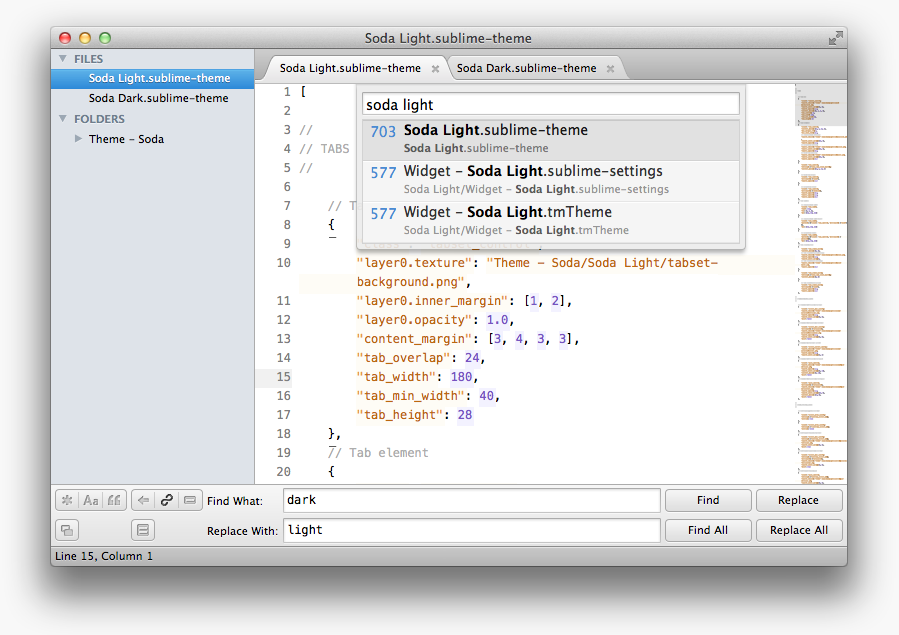
The default theme for Sublime Text is excellent, but I much prefer a custom light and dark theme, Soda, created by Ian Hill.
Installation
As taken from the Github page…
“If you are a git user, the best way to install the theme and keep up to date is to clone the repo directly into your Packages directory in the Sublime Text 2 application settings area.”
Using Git
Go to your Sublime Text 2 Packages directory and clone the theme repository using the command below:
|
1
|
git clone https://github.com/buymeasoda/soda-theme/ "Theme - Soda" |
Download Manually
- Download the files using the GitHub .zip download option.
- Unzip the files and rename the folder to Theme – Soda
- Copy the folder to your Sublime Text 2 Packages directory
Activating the Theme
To configure Sublime Text 2 to use the theme:
- Open your Sublime Text 2 User Global Preferences file:
Sublime Text 2 -> Preferences -> User Global Settings - Add (or update) your theme entry to be “theme”: “Soda Light.sublime-theme” or “theme”: “Soda Dark.sublime-theme”
Example User Global Settings
|
1
2
3
|
{ "theme": "Soda Light.sublime-theme"} |
13 – Page Crawling
Sublime Text provides us with a few different ways to query a page (outside of the standard search functions).
Functions
Need a quick way to browse to a specific function or method?

Type Control/Command + r to reveal a popup that allows for this very thing (notice the @ symbol)! Even better, the search is fuzzy as well, which is particularly helpful for huge classes.
HTML
What if you want to immediately transition to a specific part of an HTML page – say, to the div with a class of container. Type Control/Command + p, then #, and you’ll instantly see a tree of your document.

Go To Line Number
To quickly move to a specific line number on the page, you can press Control + g. However, you’ll notice that, once again, it’s pulling up that palette (Control/Command + p), and appending the : symbol. This is adopted from Vim.
This means, in addition to Control + g, you can also type, Control/Command + p, and then :LINE_NUMBER.
14 – Fetch Remote Files with Ease

Let’s say that you’re a fan of Normalize.css. Perhaps, you download it and save it to a snippet, or store the stylesheet, itself, in an assets folder. That way, for future projects, you only need to copy and paste.
The only problem with this method – as we’ve all discovered – is that, if a few months have passed, it’s more than possible that the asset (in this case, Normalize.css) will have been updated by the creator. So your options are to either use the, now, out-dated version of Normalize, or, once again, return to the GitHub page and pull in a fresh copy. This all seems tedious.
Created by Weslly Honorato, Nettuts+ Fetch is the solution to our dilemma. It can be installed, via Package Control.
Usage
You’ll only use two commands, when working with Fetch. First, we need to save some file references. Again, bring up the command palette, and search for “Fetch.” For now, choose “Manage Remote Files.”

What’s great about Sublime Text 2 is that configuration is incredibly simple. To assign references to online asset files, we only need to create an object, like so (don’t worry; one will be pre-populated for you, after installation):

So, to pull in the latest copy of jQuery (if you don’t want to use a CDN):
|
1
2
3
4
5
6
|
Learn more about using Nettuts+ Fetch.
15 – Prefixr Plugin
Built by by Will Bond (creator of Package Control), the Nettuts+ Prefixr plugin allows you to automatically update your entire stylesheet to include support for all of the various required CSS3 vendor prefixes. This way, you never have to visit the website itself; you merely type a keyboard command, and:
|
1
2
3
4
|
.box { border-radius: 10px; box-shadow: 0 0 5px rgba(0,0,0,.4);} |
…will be converted to:
|
1
2
3
4
5
6
7
8
9
|
.box { -webkit-border-radius: 10px; -moz-border-radius: 10px; border-radius: 10px; -webkit-box-shadow: 0 0 5px rgba(0,0,0,.4); -moz-box-shadow: 0 0 5px rgba(0,0,0,.4); box-shadow: 0 0 5px rgba(0,0,0,.4);} |
Usage
Once installed (via Package Control), select your stylesheet (or a single block), press ctrl+alt+x on Windows and Linux, or cmd+ctrl+x on OS X, and the code will instantly be run through the Prefixr web service.
16 – Launch Sublime From the Terminal
Sublime Text 2 includes a command line tool, subl, to work with files on the command line.”
To use it, create a symlink to the tool.
|
1
|
ln -s "/Applications/Sublime Text 2.app/Contents/SharedSupport/bin/subl" ~/bin/subl |
As long as ~/bin is in your path, that should do the trick!
|
1
2
|
cd myProjectsubl . |
Refer here for additional instructions.
17 – Autoformat HTML
A bit oddly, the ability to auto-format HTML is not included as part of the default build of Sublime Text. The Tag plugin, among other things, hopes to provide a solution, however, due to a few shortcomings – namely when dealing with HTML comments – it falls short.
The Tag plugin can be installed via Package Control.
To test its auto-formatting skills, the following HTML:
|
1
2
3
4
5
6
7
8
9
10
11
12
13
14
15
|
<html><head> <meta charset=utf8> <title></title> <!-- begin--> <!-- end comment --></head><body><h1>Hi there</h1><h2>Bye</h2></body></html> |
…will be changed to:
|
1
2
3
4
5
6
7
8
9
10
11
|
<html> <head> <meta charset=utf8> <title></title><!-- begin--><!-- end comment --> </head> <body><h1>Hi there</h1> <h2>Bye</h2> </body></html> |
Yikes; it looks worse than it is. From my tests, it incorrectly does not place the body tag on its own line, and gets pissy when dealing with HTML comments. Until these issues are fixed (or a native solution is provided), it’s best to manually select a block of HTML to reformat, rather than the entire page.
A $200 bonus will be paid to the first Sublime Text plugin developer who creates and submits the definitive “Nettuts+ HTML Formatter” plugin.
18 – Create a Plugin
If you’re feeling adventurous, dig into Sublime Text’s huge plugin development community, and start contributing. We have an excellent tutorial on the process of building a ST plugin here on Nettuts+. Be sure to check it out if that interests you!
Conclusion
The more I work with Sublime Text 2, the more I realize how incredible it is. But all of this would mean nothing if not for the fact that it’s an insanely fast editor, and, even better, it’s not finished!
No Comments